how to send/receive encrypted email using Gmail to ensure I can transfer sensitive information without prying eyes being able to read it…for at least a decade assuming their computers try cracking it. Mailvelope brings PGP encryption to Gmail, Yahoo, Outlook.com and others. It isn’t a complicated process to setup or to encrypt/decrypt messages but if you are not familiar with this it can be a little daunting. Don’t worry, I’ll walk you through this.
Step 1: Read this article that describes how Public Key encryption works. It’s a simple enough concept and they explain it very well.
Step 2: Install the Mailvelope extension in your Chrome browser.
Step 3: Setup Mailvelope inside of Chrome.
- Go to Mailvelope Options and click Generate Key (it’s a little padlock in the upper right of the browser extension toolbar or you can
- access it via the Menu > Window > Extensions)
- Enter your name
- Email address
- Encryption method (I recommend making it the strongest possible, RSA/4096)
- Enter a very strong passphrase (this can include spaces) A quote by a famous person is extremely secure passphrase e.g. Paper is poverty; it is the ghost of money and not money itself. Thomas Jefferson
- You now need to share your public key with anyone you want to send encrypted emails with
- Go to Display Keys
- Click the blue export button and choose Display public key
- In the ‘Export Key’ dialog box that appears, click Create file.
- This will download your public key into a text file that you will share with anyone you want to email.
- I have posted my public key on my website and will have it in Dropbox to easily send to anyone. (NEVER EVER SHARE YOURPRIVATE KEY OR POST IT ANYWHERE)
Step 4. Import the public keys for those you want to email. They can email you their public key as text or as an attachment. They will export their public key as descibed above. If you don’t have the other person’s public key, you won’t be able to encrypt the message for them.
Sending an encrypted message will add a few extra steps to your email workflow. I’ll write up the Cliff notes version here but you can read a more detailed description on http://www.mailvelope.com/help
Step 5. Compose and Send your encrypted email
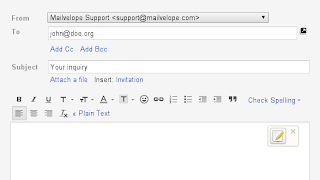
Click Gmail’s Compose button.
- Inside your message body you should see an icon with a pen & paper on it. Click this.
- A new composition window will open and this is where you’ll compose your message (not inside the regular Gmail compose window)
- Type your message and when done, click the padlock button. This is where you choose who you will encrypt the message for (assuming you’ve been given their public key and imported it into Mailvelope)
- Click Add for each email recipient you want to be able to decrypt the message. Then click Ok.
- The text you typed will change into a paragraph of alphanumeric characters which is your message but encrypted.
- Now click the Transfer blue button and this will copy that text into the regular Gmail compose window)
- Send your message to the same email address as the one you encrypted it for and the person on the other end will decrypt your message using their private key.
- To decrypt a message, open the email and you’ll see this type of image.
- Mailvelope will look for the corresponding private key that is needed to decrypt this message. When it finds it, it will show this dialog box.
- Enter your private key password and the message will be decrypted and displayed.
- Mailvelope will look for the corresponding private key that is needed to decrypt this message. When it finds it, it will show this dialog box.


No comments:
Post a Comment